• Skip to primary navigation
  • Skip to main content
  • Skip to primary sidebar

Crossfield Collection Recipes

  • Main Dish
  • Beverages
  • Appetizers
  • Cakes
  • Cookies
  • Holiday
  • Books
  • Journal
You are here: Home / Archives for Serena

Serena

Spanish Rice – Barb Humphrey

February 19, 2024 by Serena Leave a Comment

BROWN 1 pound ground beef with 2 cups of instant rice and one chopped onion

ADD 2 8oz cans tomatoe sauce and w cups of hot water
Mix in 1 tsp each of salt and pepper and 1/2 tsp prepared yellow mustard

Bring to a boil quickly and then reduce heat and simmer for five minutes

Minute Rice = Uncle Ben’s brand of Minute Rice
Filed Under: beef, Family, Main Dish

Honey Roasted Carrots and Parsnips

January 13, 2024 by Serena Leave a Comment

Ingredients

4 medium carrots
4 medium parsnips
2 tablespoons honey
2 tablespoons butter, melted
2 tablespoons olive oil
1 teaspoon kosher salt
1/2 teaspoon black pepper
fresh thyme sprigs or parsley if desired

Instructions

  1. preheat oven to 425 degrees. Line a try with parchment or alum foil.
  2. scrub carrots and parsnips well, and slice off the root and stem ends.
  3. Cut the vegetables in half, then cut each half lengthwise in half or into thirds for the thicker ends. Optional – cut into round thin slices.
  4. spread the carrots and parsnips ina single layer of a parchment lined baking sheet and put the honey mixture over them. Toss with hands to coat well. (use a plastic bag and shake to evenly coat and then pour on the baking sheet for less mess)
  5. Sprinkle with thyme, salt, and pepper
  6. Roast for 30 minutes, turning halfway through, or until the vegetables are fork tender and beginning to brown.
  7. Serve hot, garnished with more fresh thyme springs or parsley if desired.

HELPFUL TIPS

  • Try to cut the vegetables into equal sized pieces to ensure that they cook evenly.
  • Make sure the vegetables are spread in a single layer on the baking pan. This will allow the pieces to cook evenly, and also let’s them brown instead of steam.
  • You can easily double or even triple this recipe.
  • You can use just carrots for honey roasted carrots, or parsnips for honey roasted parsnips.
  • For a vegan version of these glazed parsnips and carrots, substitute maple syrup for the honey and replace the butter with more oil.
  • If you like a little bit of spice to balance the sweetness, try adding a pinch of red pepper flakes to the honey mixture before coating the veggies.
  • Store leftovers in the fridge in an airtight container for up to three days.


Filed Under: printed in binder, Vegetable

Keuka Slaw for Asian Salad

January 13, 2024 by Serena Leave a Comment

1 envelope of Good Seasons Italian Dressing Mix
1/2 cup sugar
2 tablespoons soy sauce
2 packages of coleslaw blend (cabbage salad mix – 16 ounce each)
4 green onions, sliced
1/2 cup dry roasted sunflower kernels
1/2 cup sliced almonds, toasted

Prepare dressing mix in dressing in shaker or small bowl as directed on envelope (water, vinegar, oil, dry mix ). Stir in sugar and soy sauce.

BREAK apart Noodles, place in large bowl. Discard ramen seasoning packets or reserve for another use.
Add coleslaw mix and  blend, onions, sunflower kernels and nuts to noodles, mix lightly.

Add dressing: toss to coat.

The ramen noodles will soften as it stays in the liquid mix.

Makes 12 servings of 1 cup each.

Prep time is 15 minutes.

This is also known as Asian Salad from Good Seasons.com


Filed Under: Salads, side dish

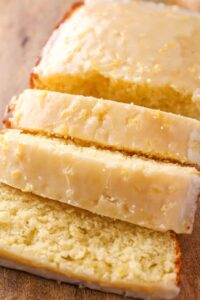
Lemon Loaf 2023

December 31, 2023 by Serena Leave a Comment

three slices of lemon loaf

Ingredients

½ cup unsalted butter softened
1 cup granulated sugar
2 large eggs
4 tbs lemon juice freshly squeezed
2 tbs lemon zest
1-½ cups all-purpose flour
2 teaspoon baking powder
pinch salt
½ cup buttermilk*
Lemon Glaze
½ cup powdered sugar
2-4 tbs lemon juice freshly squeezed

Instructions
Preheat oven to 350°F. Grease and line the bottom of a 9×5″ loaf pan with parchment paper.
In a large bowl, gently whisk flour, baking powder and salt together. Set aside.
In a separate bowl, cream butter and sugar together until light and fluffy. Beat in eggs, lemon juice and zest until combined. Alternate adding flour mixture and buttermilk and mix well after each addition. Be sure to not over-mix.
Pour batter into prepared baking pan and bake for 30-35 minutes in 9×5″ pan. Bread is done when a toothpick inserted into the center comes out with just a few moist crumbs. Don’t be alarmed at how the outside of this ;e
Allow bread to cool for 10 minutes in pan before inverting onto a wire rack to finish cooling.
For the lemon glaze
Whisk all glaze ingredients together in a small bowl. While lemon loaf is on the wire rack, poke holes into the top of warm bread with a toothpick or other small object. Drizzle half of the glaze on top of the bread and spread it around into the holes. Allow this layer to set for a minute or so before adding another layer on top.

Notes
To make your own buttermilk: Stir in ½ tablespoon of white distilled vinegar to the milk. Allow to sit for 5-10 minutes until thickened.
Storage Instructions: Store at room temperature for up to 5 days in an airtight container.
Freezing Instructions: Wrap loaf without icing tightly in a layer of plastic wrap followed by a layer of foil. Place in a resealable, freezer-safe bag. Freeze for up to 3 months. To Thaw: Thaw overnight in the refrigerator or on the counter. Prepare glaze and drizzle on top before serving.

Notes: 2023 – made this recipe from https://sprinklesomesugar.com/lemon-loaf/ and used the new long bread pans that I purchased from Amazon. First loaf – followed recipe as written. Second loaf – used dry buttermilk powder with water instead of vinegar and milk method.  Did not notice any difference.  This recipe only filled the pan so the slices were only a couple of inches thick and the batter did not rise as much as I thought it would in the new pan. 

Filed Under: Desserts, printed in binder

Butter Balls

December 15, 2023 by Serena Leave a Comment

Butter Balls 

Also known as Snowballs, Mexican Wedding Teacakes

1 cup butter
1 tsp vanilla
1/4 cup powered sugar
2 cups sifted flour
1 cup chopped nuts (walnuts)
Confectioners sugar to roll in after baking

Cream butter and sugar until light and fluffy. Add flavoring. Stir in flour and nuts and blend well.
Form into tiny balls and place on ungreased cookie sheet.

Bake at 350 degree oven about 20 minutes.

Roll cookies in confectioners sugar while warm.

Makes about six dozen cookies (if balls are small)

This is the original recipes I used when learning to bake in the 1970’s. Handwritten recipe card in box.


Filed Under: Cookies, Holiday

Dry Rub Chicken Wings – Zerrin & Yusuf

October 20, 2023 by Serena Leave a Comment

Dry Rub For Wings: 

  • ½ tablespoon onion powder
  • 1 teaspoon garlic powder
  • 2 teaspoons light brown sugar, packed
  • ½ teaspoon chili powder
  • ½ teaspoon salt
  • ¼– teaspoon black pepper
  •  ½ teaspoon dried oregano
  • ½ teaspoon dried thyme
  • 1 tablespoon paprika (smoke or sweet)

Instructions  For Oven:

  1. Preheat the oven to 400 F / 200 C. Line a baking sheet with parchment paper or aluminum foil. Place an oven safe cooling rack over it. Spray it with cooking spray or brush it with oil.
  2. Pat the chicken wings dry and place them in a large bowl.
  3. Pour olive oil over them and toss with a spatula. This oil will help the seasoning stick on the wings.
  4. Sprinkle the dry rub mixture over the wings and massage it into all the wings. You can wear gloves if you want.
  5. Place the chicken wings on the prepared cooling rack and bake for 20 minutes.
  6. Remove from the oven, flip each wing over and bake for another 10 minutes.

NOTES:

    1. Pat drying the chicken wings is crucial in this recipe, so don’t skip it.
    2. When applying the dry rub on the wings, be generous. It is better to use your hands when doing this.
    3. If you have time, let the dry rubbed chicken wings rest in the fridge for 30 minutes or 1 hour. This will help the rub penetrate the wings.
    4. Make sure the wings are placed in a single layer.
    5. Measure the chicken wings with a meat thermometer if you want. They need to reach an internal temperature of 165 F degrees.
    6. You can cook these dry rub wings in the oven or in air fryer.
  1. If you are planning to use frozen chicken wings, thaw them overnight in the fridge and then follow the recipe.

This dry rub can be used on chicken, beef and pork. It is even great on vegetables when roasting them

Found while doing a search for how to make bake chicken wings in the oven.

Home


Filed Under: chicken

Sweet Pickle Relish

August 29, 2023 by Serena Leave a Comment

Ingredients
3 to 4 pounds medium pickling cucumbers, unpeeled, finely chopped ( (6 to 8 cups)
2 cups finely chopped onions (2 to 3 medium)
3 tablespoons pickling salt
2 to 3 cups of ice cold water
1 1/2 to 3 cups granulated sugar (depending on how sweet you like your relish)
2 cups cider vinegar at 5% acidity
1 1/2 teaspoons mustard seeds
1 1/2 teaspoons celery seeds

Instructions
1. In a large bowl, layer the cucumbers, onions, and salt. Add enough cold water to completely cover the vegetables. Cover and let stand at room temperature for 2 hours.

2. Drain the vegetables in a large fine-mesh sieve or colander lined with a single layer of cheesecloth. Rinse well and drain again, pressing out the excess liquid.

3. IN a 6 to 8 quart stainless steal pot, combine the sugar, vinegar, mustard seeds, celery seeds. Bring the mixture to a boil over medium high heat, stirring constantly until the sugar is completely dissolved. About 5 minutes.

4. Add the drained vegetable to the syrup and return to a boil. Reduce the heat and simmer, stirring frequently for 10 minutes. Remove from the pot from the hear. The mixture may look watery but that is okay. Ladle the relish into hot pint jars, leaving 1/2 inch headspace. Remove air bubbles. I also use half pint jars so I have smaller jars when opened. Wipe the jar rims and threads with a clean, dampt paper towel. Apply hot lids and screw bands.

5. If you are simply stashing the relish in fridge, refrigerate the jars of relish for up to a few weeks.
If you are properly canning the pickle relish, process 8 ounce jars in a water bath canner according to recommended directions and time. 10 minutes for pints and 15 minutes for quarts. 10 minutes for half pint jars.  Remove from water bath canner and let cool for 12 to 24 hours. Check the seals and remove the screw bands. Store in a cool, dry, dark place for up to one year.

2023 – made in half pint jars


Filed Under: Pickles and Relish, Preserving, Vegetable

Baking Yesteryear by B. Dillon Hollis

August 18, 2023 by Serena Leave a Comment

B. Dillon Hollis’s cookbook entitled BAKING YESTERYEAR: The Best Recipes was released on July 27, 2023 and I bought a copy of the hardback book as well as the Kindle version.

I have enjoyed watching his videos on Utube and watched some of his tic-tocks with admiration for his humor and quirks about cooking and using old recipes.

Cover photo of cookbook


Filed Under: Cook Books

Mini Morsel Cookies bar cookies

July 26, 2023 by Serena Leave a Comment

2 1/4 cups of all-purpose flour
1 tsp baking soda
1 cup (two sticks) butter, softened
3/4 cup granulated sugar
3/4 cup brown sugar
1 tap vanilla
2 large eggs
1 2/3 cups semi-sweet mini morsels
1 cup chopped nuts – optimal
(if omitting nuts add 1 to 2 TBS all purpose flour)

Preheat oven to 375 degrees.

In a small bowl combine flour, baking soda and salt.

In a large mixing bowl, beat butter, granulated sugar and brown sugar and vanilla until creamy,

Add eggs, one at a time, beating well after each egg. Beat in the flour mixture gradually.

Stir in the chocolate morsels and nuts.

Drop onto ungreased baking sheets by rounded tablespoons. Bake for 9 to 11 minutes or until golden brown

Can also put into a baking pan 9×9 inch and then bake so they can be cut in small squares.

Cool on baking sheets for two minutes and then cool completely.


Recipe from the bag of Nestle Toll House Semi-sweet Mini Morsels

Filed Under: Uncategorized

6-in-1 Sheet Pan Cookie Bars

July 26, 2023 by Serena Leave a Comment

Prior to the family picnic this year 2023 I tested several recipes for what to bring as a dish to pass. I found a picture of a sheet pan bar cookie that features six different variations. Made one batch of cookie dough baked into six different flavors in the same sheet pan so that there would be a variety of options.

We’re talking chocolate chip, snickerdoodle, peanut butter, white chocolate macadamia nut, oatmeal raisin and chocolate chocolate chip.

Source of Recipe: The BakerMama
https://thebakermama.com/recipes/6-in-1-sheet-pan-cookie-bars/

Reactions: they were good but not exceptional. The steps to make separate batches with separate add-ins and the patting out to fill in the pan seemed like a lot of steps.
In the future I think that I would just use my regular favorite cookie dough (since I make cookies so often) and keep out 3/4 cup of dough and put that small amount in the freezer labeled with variation.  Then I would let the frozen balls thaw and then pat into the large ban.

The concept of having six in one pan was the attraction and highlight that drew me to this recipe.  The base dough made all of the cookies tasted similar and I much prefer my own recipes for the chocolate chip, snickerdoodle, peanut butter, white chocolate macadamia nut, oatmeal raisin and chocolate chocolate chip.  The idea was great!!!

Filed Under: Cookies

  • « Go to Previous Page
  • Page 1
  • Page 2
  • Page 3
  • Page 4
  • Interim pages omitted …
  • Page 17
  • Go to Next Page »

Primary Sidebar

Recent Posts

  • My Best Clam Chowder
  • Banana Cake with Cream Cheese Frosting
  • Easy Goulash Recipe
  • 2024 zucchini rounds
  • 2024 Peanut Butter Cookies

Recent Comments

    Archives

    • February 2025
    • January 2025
    • August 2024
    • June 2024
    • May 2024
    • March 2024
    • February 2024
    • January 2024
    • December 2023
    • October 2023
    • August 2023
    • July 2023
    • June 2023
    • May 2023
    • February 2023
    • January 2023
    • December 2022
    • November 2022
    • October 2022
    • September 2022
    • August 2022
    • July 2022
    • May 2022
    • April 2022
    • January 2022
    • December 2021
    • November 2021
    • October 2021
    • September 2021
    • August 2021
    • July 2021
    • June 2021
    • May 2021
    • April 2021
    • January 2021
    • December 2020
    • November 2020
    • October 2020
    • September 2020
    • August 2020
    • July 2020
    • June 2020
    • January 2020
    • October 2019
    • September 2019
    • August 2019
    • July 2019
    • December 2018
    • October 2018
    • September 2016
    • October 2014
    • January 2014
    • December 2013
    • October 2013
    • September 2013
    • June 2010
    • February 2010
    • January 2010
    • October 2009

    Categories

    • appetizer
    • beef
    • Beverages
    • Bread
    • Breakfast
    • cabbage
    • Cakes
    • Candy
    • casseroles
    • chicken
    • Cook Books
    • Cookies
    • Desserts
    • drinks
    • Equipment
    • Family
    • Featured
    • Holiday
    • jams jelly preserves
    • Main Dish
    • pasta
    • Pickles and Relish
    • Pie and Pastry
    • Preserving
    • printed in binder
    • pumpkin
    • Recipe Box on desk
    • rhubarb
    • Salads
    • seafood
    • side dish
    • Soup
    • turkey
    • Uncategorized
    • Vegetable
    • zucchini

    Meta

    • Log in
    • Entries feed
    • Comments feed
    • WordPress.org

    Copyright © 2025 Crossfield Collection Recipes on the Foodie Pro Theme